Getting started with Kubernetes using Minikube - Installation
Introduction
I am working on a series of opinionated posts on how to get started with the basics of Kubernetes using Minikube. In these posts, I will discuss on a range of topics starting from the installation of Minikube to the deployment of pods and also workarounds for a few annoying issues I faced along the way. This is the first article of the series where I talk about how to install Minikube in your local computer.
Table of Contents
- Introduction
- Kubernetes
- Minikube
- Installation
- Starting up
- A few additional Minikube commands
- Conclusion
Kubernetes
From the Wikipedia:
Kubernetes is an open-source container-orchestration system for automating application deployment, scaling, and management.
Kubernetes is probably the most popular and widely used system for deploying and managing scalable and highly available applications world wide. Not only that Kubernetes can be self-hosted, managed Kubernetes cluster services are available on most of the major cloud service providers including AWS, Azure and Google Cloud.
Minikube
Minikube is a command line tool for running single node Kubernetes clusters in local workstations. Although Minikube only supports a subset of all the Kubernetes features, considering the fact that a full blown Kubernetes installation requires considerable hardware resources, Minikube is a fantastic tool meant for users or developers who want to try out Kubernetes in local computer or deploy services in local Kubernetes before pushing to an actual multi-node test or production environment.
It is worth noting that Minikube is not the only available learning environment solution for Kubernetes but Minikube is one of the most mature ones and is supported on all three major platforms - MacOS, Linux and Windows.
Installation
In this section, I will share the steps of installing Minikube and the required components on MacOS and Debian Linux. These steps should work on any other Debian based Linux distributions including Ubuntu. However if you are using a different variant of Linux, the steps might be different. To install on other operating systems, follow this official guide from Kubernetes.
Kubectl
Kubectl is not exactly a part of Minikube but it’s a command-line tool for interacting with a Kubernetes cluster and perform various administrative tasks including deployment of pods.
To install kubectl on Debian, follow the below steps:
#Install the repository key
curl -s https://packages.cloud.google.com/apt/doc/apt-key.gpg | sudo apt-key add -

#Add the Kubernetes repository to sources
echo "deb https://apt.kubernetes.io/ kubernetes-xenial main" | sudo tee -a /etc/apt/sources.list.d/kubernetes.list

#Update the APT package index
sudo apt update

#Install kubectl
sudo apt install -y kubectl
On MacOS, if you have Docker Desktop installed then you already have kubectl installed. Otherwise the package can be easily installed using Homebrew
brew install kubectl
VM Driver
Minikube can be deployed as a VM, a container or on bare-metal. My preferred way is to run it as a VM. To do so, we are going to need a hypervisor or a VM driver. On Linux I prefer using kvm and on MacOS, I prefer using Hyperkit. If you are using any VPN software on your Mac, then you might want to check this section before selecting a VM driver.
To install kvm on Debian 10, run the following command:
sudo apt install qemu-kvm \
                 libvirt-clients \
                 libvirt-daemon-system
For more information, refer to the Debian wiki on KVM. Also you may need to turn on Intel VT-x or AMD-V depending on your chipset to benefit from the hardware acceleration capabilities of your CPU.
On MacOS, if you are running Docker Desktop then you already have Hyperkit installed. If not, you can install it using Homebrew.
brew install hyperkit
Minikube
Install on Debian
To install Minikube on Debian follow the steps.
- Download the .deb file from the latest Minikube release page. At the time of writing the post, the latest version was 1.9.2.
curl -LO https://storage.googleapis.com/minikube/releases/latest/minikube_1.9.2-0_amd64.deb
- Install the downloaded package. Replace minikube_1.9.2-0_amd64.deb with the actual downloaded package name.
sudo dpkg -i minikube_1.9.2-0_amd64.deb
Install on MacOS
With Homebrew, it’s fairly easy to install Minikube on MacOS.
brew install minikube
Starting up
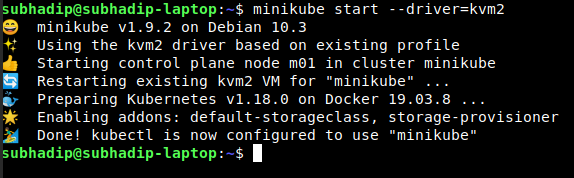
To start Minikube on Debian, I use the following command:
minikube start --driver=kvm2
The –driver=kvm2 flag tells Minikube to use the kvm2 VM driver.
If everything is properly configured and Minikube is successfully started, you should see something like this:
Similarly here is the command to start Minikube on MacOS:
minikube start --driver=hyperkit
The –driver=hyperkit tells Minikube to use the hyperkit VM driver.
DNS issue on Mac when Docker Desktop is running
I have Docker Desktop installed on my Mac and if Docker Desktop is started first, then I get the following error while starting Minikube:

I could not determine whether the Docker Desktop or the VPN software running on my Mac was causing this error. Because of this problem, the Minikube VM fails to resolve any domain name and deployment of Docker images from Docker Hub fails. As a workaround, I use the following command to start Minikube on my Mac:
minikube start --driver=hyperkit \
               --hyperkit-vpnkit-sock=/Users/${USER}/Library/Containers/com.docker.docker/Data/vpnkit.eth.sock
The –hyperkit-vpnkit-sock=/Users/${USER}/Library/Containers/com.docker.docker/Data/vpnkit.eth.sock flag tells minikube to use the Docker Desktop vpnkit sock.
Routing issue on Mac with Hyperkit when Cisco Anyconnect VPN is running
In recent years, I have had less success in running Minikube with hyperkit or even virtualbox as the VM driver on a Mac where Cisco Anyconnect is also running. As a workaround, I am now using the Docker Desktop as the VM driver for running Minikube even though I am not a fan of it especially after their recent licence update.
To start Minikube on MacOS with docker as the VM driver, use the following command:
minikube start --driver=docker
A few additional Minikube commands
To check the running status of the Minikube cluster, use the following command:
minikube status
To stop the Minikube cluster, use:
minikube stop
To delete the local Minikube cluster, use:
minikube delete
To launch the Kubernetes Dashboard, use:
minikube dashboard
Conclusion
These steps were tested on Debian 10 Buster and MacOS Mojave. kubectl and minikube can be installed in various other ways including downloading as executable binaries and using without installing. But I like the above approaches because they give me the flexibility of managing the packages with a package manager.
In the next post, I will discuss about deploying pods in our Minikube cluster.