Getting started with Kubernetes using Minikube - Deploying an application
Introduction
This is my second article in the Kubernetes with Minikube series. In the first article I discussed about how to create a local Kubernetes cluster with Minikube. In this article, I will be talking about deploying an application in a local Minikube cluster.
Table of Contents
Simple Web service
Simple Web service is a Spring Boot
application written it Java. It has the following REST endpoint:
GET /details. And here is how the response looks like:
{
  "Host name": "simple-web-service-deployment-66c45446b8-9x8bh",
  "IP address": "172.17.0.6"
}
It basically returns the host name and the IP address of the container or VM it is running on.
The source code for the Simple Web service is available on this GitHub link. The application is dockerized and published on Docker Hub as well. I am going to use it as a sample application for deploying in our Minikube cluster.
Deployment
Deployments
are a way to tell Kubernetes how you want to have your application deployed.
And a Deployment is described by a Deployment resource. Following is an
example of a Deployment resource named deployment.yaml. I am going to
use it to deploy our Simple Web service.
apiVersion: apps/v1
kind: Deployment
metadata:
  name: simple-web-service-deployment
  labels:
    app: simple-web-service
spec:
  replicas: 2
  selector:
    matchLabels:
      app: simple-web-service
  template:
    metadata:
      labels:
        app: simple-web-service
    spec:
      containers:
      - name: simple-web-service-application
        image: subhadig/simple-web-service
        ports:
          - containerPort: 8080
A few important points about the above Deployment resource:
- The
metadata.namefield specifies the name of our Deployment. - The
metadata.labelsfield asks Kubernetes to add theapp: simple-web-servicelabel to our Deployment. - In the
specsection, thereplicafield tells Kubernetes to create 2 replicas of our application. - The
spec.template.metadata.labelsfield defines which tags (app: simple-web-service) will be added to the Pods running our application and thespec.selectorfield tells that our Deployment will only manage the Pods labeled withapp: simple-web-service. - The
template.specfield says that each Pod will run one container with the name simple-web-service-application. The container will be created from the subhadig/simple-web-service image which is available on the Docker Hub and it will have the 8080 port exposed.
Now to apply this deployment.yaml in our Minikube cluster, use the
following command:
# cd to the directory containing the deployment.yaml file
kubectl apply -f deployment.yaml
To check the created Pods and their status, use:
kubectl get pods
And you should see something like this:

Service
In the previous section, I deployed our Simple Web service which is running inside Pods. But Pods are mortal, they are not static, they are automatically created and destroyed by Kubernetes. Because of this, the Pod IP addresses can not be relied upon if I need to access them from outside or from another Pod. So I will need a level of abstraction that will talk to the Pods on behalf of me and will be static in nature. Services are that abstraction.
Here is how our service.yaml, the definition of our Service will look like:
apiVersion: v1
kind: Service
metadata:
  name: simple-web-service-cluster-ip
spec:
  ports:
  - port: 80
    protocol: TCP
    targetPort: 8080
  selector:
    app: simple-web-service
  type: ClusterIP
A few points to note:
- The
metadata.namespecifies the name of this service. This is going to be used in the next section to refer to this service. - In the
specsection, I am mapping the TCP 8080 port of all the Pods that have the labelapp: simple-web-serviceto the 80 port of this service. - The
typefield tells which type of Service this is. A ClusterIP service exposes the service on a cluster-internal IP address.
Ingress
Stress on the last line of the previous section. Although our application has
a stable IP address now, it is still not reachable from the outside world.
What this means for us is that we can’t invoke the /details REST endpoint of
our Simple Web service from outside Minikube yet. To fix this, I will have
to set up our
Ingress controller
first.
An Ingress controller is a component within Kubernetes that acts as a bridge between the services and the external world, allowing HTTP(S) connection to reach from the outside world to the services running inside Kubernetes.
Minikube comes with a built-in NGINX Ingress Controller but it’s disabled by default. To enable it, run the following command:
minikube addons enable ingress
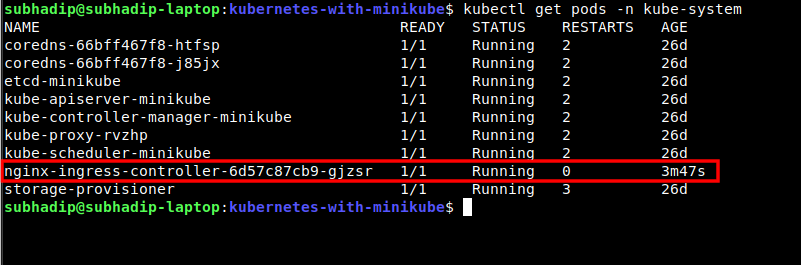
After that, use the following command to check for the Ingress controller status.
kubectl get pods -n kube-system
Wait for the nginx-ingress-controller to be running.
After our Ingress controller is up, I need to
configure it.
I will need to prepare an Ingress resource similar to the other resources
that we used in the previous sections. I am going to call it the ingress.yaml.
apiVersion: networking.k8s.io/v1beta1
kind: Ingress
metadata:
  name: simple-web-service-ingress
spec:
  rules:
  - http:
      paths:
      - path: /
        backend:
          serviceName: simple-web-service-cluster-ip
          servicePort: 80
A few points to note about the ingress.yaml:
- The
kindfield says that it is an Ingress type resource. - The
metadata.namefield specifies the name of this resource. - The
pathfield specifies that all the HTTP requests coming to the/context root from outside should be forwarded to the80port of the simple-web-service-cluster-ip service that I created in the previous section.
To push the Ingress resource, execute the following command:
kubectl apply -f ingress.yaml
Accessing the web service
Now that we have everything in place, it’s time to access our Simple Web service. Minikube is exposed to the host system with a host-only IP address. This IP address can be obtained with the below command:
minikube ip
In my case, this outputs the following IP address: 192.168.64.24. Now if I go
to the following link from my web browser: http://192.168.64.24/details, I
will get the below response:
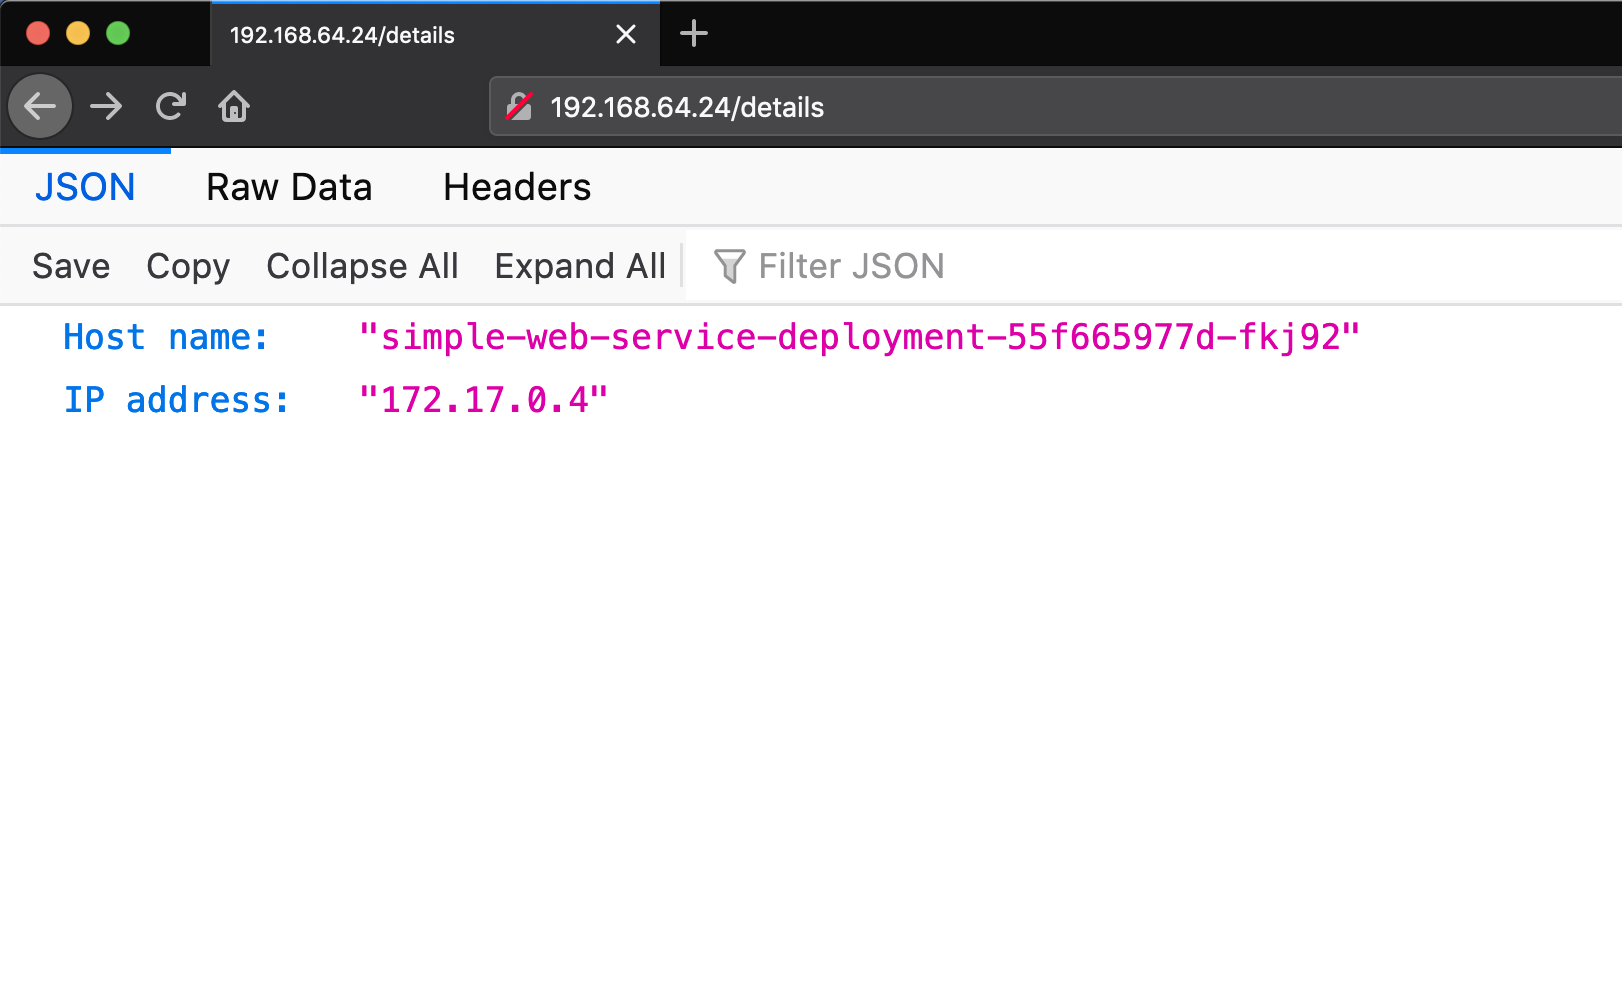
If I try the link multiple times, I will get another response where the
Host name and the IP address will be different.
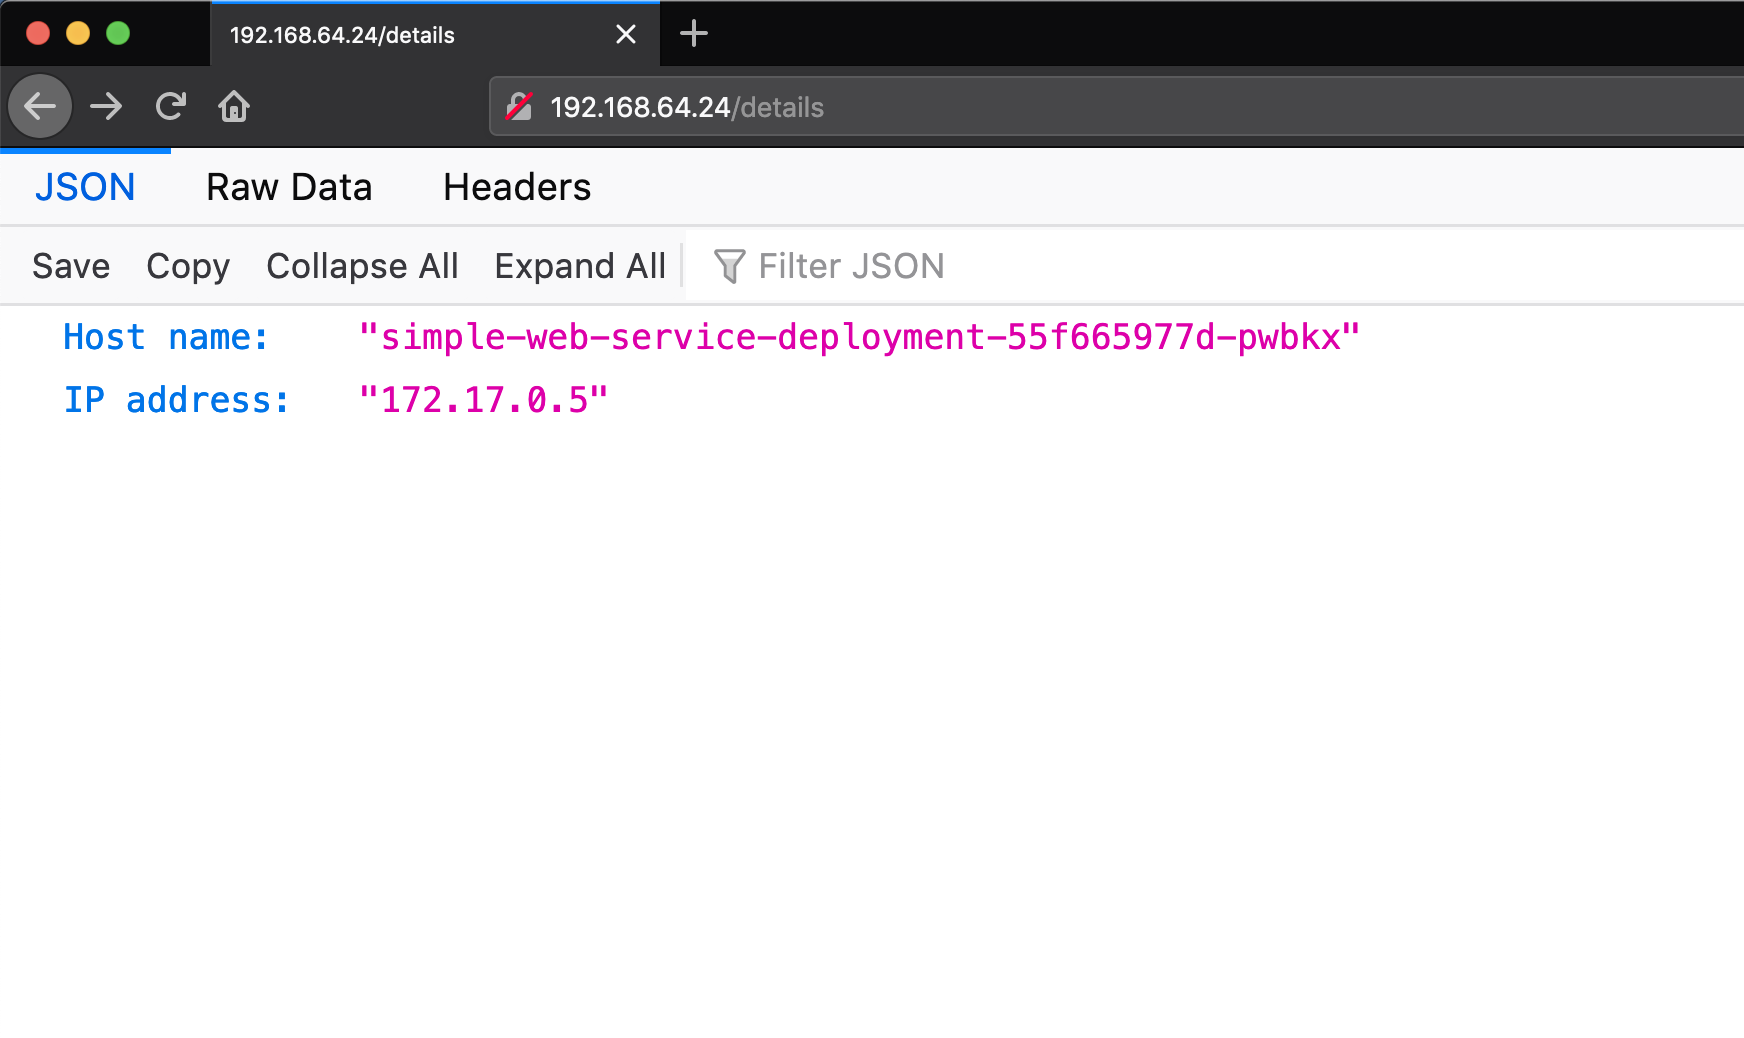
This is because in the Deployment section, I have deployed two pods of our
Simple Web service application and the simple-web-service-cluster-ip
Service will route the incoming requests to both the Pods alternatively.
Conclusion
This article gives a basic idea about the steps involved in deploying an
application in Kubernetes.
The steps were tested with the Minikube version v1.9.2.
For accessing the service simple-web-service-cluster-ip from outside,
alternatively I could have used NodePort or LoadBalancer methods as
explained here.
The source code of the resources files along with the source code of the Simple Web service can be found in this GitHub repository. If you have any feedback or comment about any of the steps, please let me know in the comments.