My list of things to do after installing Debian on the PC
Introduction
I like the fact that Debian does not do a lot of customizations over the upstream packages by default but this also means extra work for you for setting up things after installing Debian on the PC. The upside is that you get to customize things exactly the way you like it. It definitely helps to have a list to start with and this post lists down some of the customizations I make after installing a fresh copy of Debian.
Table of Contents
- Introduction
- Update apt sources
- Adding a swap file
- Install updates and required packages
- Enable bash completion
- Enable auto-update
- Add firewall rules
- Install latest Firefox
- Enable showing user lists at login
- Create users
- Desktop Environment specific customizations
- Conclusion
Update apt sources
The Debian package archive contains the following areas:
- main: the Debian distribution
- contrib: supplemental packages intended to work with the Debian distribution, but which require software outside of the distribution to either build or function;
- non-free: supplemental packages intended to work with the Debian distribution that do not comply with the DFSG or have other problems that make their distribution problematic.
- non-free-firmware: non-free firmware related packages that have a separated archive area for easy preparation of the installation media containing these packages.
On a default installation of Debian, the apt sources.list only includes the main
archive area.
To also include the other archives, edit the /etc/apt/sources.list with root
permission and add them as below.
deb http://deb.debian.org/debian/ bookworm main contrib non-free non-free-firmware
deb-src http://deb.debian.org/debian/ bookworm main contrib non-free non-free-firmware

deb http://security.debian.org/debian-security bookworm-security main contrib non-free non-free-firmware
deb-src http://security.debian.org/debian-security bookworm-security main contrib non-free non-free-firmware

deb http://deb.debian.org/debian/ bookworm-updates main contrib non-free non-free-firmware
deb-src http://deb.debian.org/debian/ bookworm-updates main contrib non-free non-free-firmware
Adding a swap file
Nowadays I prefer having swap files over swap partitions, mainly because files can be resized more easily than partitions. This is useful when I want to change the swap size. To create a swap file and use as swap, execute the following commands:
sudo dd if=/dev/zero of=/swapfile bs=1024 count=$((4*1024*1024)) #create an empty file of size 4GB
sudo chmod 600 /swapfile #restrict the permissions of the file
sudo mkswap /swapfile #convert the file type to a swap file
sudo swapon /swapfile #use the file as swap
And to reload the swap configurations after restart, append the following to /etc/fstab:
# Swap file created on DATE
/swapfile       none    swap    sw      0       0
More details can be found on the Debian wiki.
Install updates and required packages
This section lists the commands to install the packages that I absolutely need to have on my system and does not come pre-installed with Debian.
sudo apt update
sudo apt upgrade
sudo apt install \
        tmux \
        fzf \
        neovim \
        git \
        wget \
        bash-completion \
        chromium \
        bsd-mailx \
        unattended-upgrades \
        apt-listchanges \
        pass \
        pwgen \
        firewalld \
        thunderbird
Here are the brief descriptions about the installed packages:
- tmux - tmux is a multiplexer for the Terminal. I spend a lot of time on the Terminal and tmux makes it easy to manage multiple open Terminals.
- fzf - A fuzzy finder for the command line.
- neovim - vim is my text editor of choice. neovim is my vim of choice.
- git - git command line client.
- wget - a download manager.
- bash-completion - a utility for autocompletion on bash.
- chromium - the open source variant of the Google Chrome browser.
- bsd-mailx - a very simple mail client for Unix mails.
- unattended-upgrades - required for installation of automatic system updates.
- apt-listchanges - required by unattended-upgrades for sending change-list of installed updates.
- pass - a command-line based password manager. More here.
- pwgen - a command-line based random password generation utility.
- firewalld - a command-line based firewall.
- thunderbird - an email client.
Enable bash completion
In the earlier versions for Debian, tab-completion for bash did not come enabled by default. But at least in Debian 12, this automatically gets enabled. If it is not enabled by default for you, uncomment the following section in /etc/bash.bashrc to enable it for all users:
if ! shopt -oq posix; then
  if [ -f /usr/share/bash-completion/bash_completion ]; then
    . /usr/share/bash-completion/bash_completion
  elif [ -f /etc/bash_completion ]; then
    . /etc/bash_completion
  fi
fi
If you only want to enable it for selected users, paste the above content in the
~/.bashrc file.
Enable auto-update
The Gnome and KDE variants of Debian come with pre-installed utilities for automatic installation of system updates but not the XFCE variant, the one that I use. But it can be achieved through unattended-upgrades.
To enable unattended upgrades, make sure that the in the /etc/apt/apt.conf.d/50unattended-upgrades file the following section has at least the Debian and Debian-Security lines uncommented:
Unattended-Upgrade::Origins-Pattern {
    // Codename based matching:
    // This will follow the migration of a release through different
    // archives (e.g. from testing to stable and later oldstable).
    // Software will be the latest available for the named release,
    // but the Debian release itself will not be automatically upgraded.
    //      "origin=Debian,codename=${distro_codename}-updates";
    //      "origin=Debian,codename=${distro_codename}-proposed-updates";
    "origin=Debian,codename=${distro_codename},label=Debian";
    "origin=Debian,codename=${distro_codename},label=Debian-Security";

    // Archive or Suite based matching:
    // Note that this will silently match a different release after
    // migration to the specified archive (e.g. testing becomes the
    // new stable).
    //      "o=Debian,a=stable";
    //      "o=Debian,a=stable-updates";
    //      "o=Debian,a=proposed-updates";
    //      "o=Debian Backports,a=${distro_codename}-backports,l=Debian Backports";
};
If you also have Google Chrome installed and you want unattended upgrade to take care of the Google Chrome updates automatically, add the following line to the above section.
"origin=Google LLC,codename=stable,label=Google";
To enable update reports over mail, uncomment the following section and add the user to which the reports should be sent:
Unattended-Upgrade::Mail "subhadip";
To enable the unattended-upgrades to run periodically, run the following command:
sudo dpkg-reconfigure -plow unattended-upgrades
Add firewall rules
By default the Debian firewall policy allows all incoming and outgoing network traffics. This is not necessarily insecure but I prefer restricting what goes in and comes out of my system. In the past, I used to use an iptables based script to customize the firewall policy. But as of Debian 10, iptables is replaced by nftables and the usage of firewall management utilities like firewalld is recommended.
firewalld does not come installed by default and needs to be installed manually. OOTB, firewalld uses the public zone as default which allows outgoing traffic but blocks incoming traffic on all ports except ssh and dhcpv6-client. To disable them, use the following commands:
sudo firewall-cmd --remove-service=ssh --permanent
sudo firewall-cmd --remove-service=dhcpv6-client --permanent
Install latest Firefox
Debian comes with the ESR version of Firefox. To install the latest stable version of Firefox, I use a bash script which is hosted on my GitHub account. Download and run the script as executable.
wget -O firefox-updater.sh https://raw.githubusercontent.com/subhadig/dotfiles/master/bin/firefox-updater
chmod u+x firefox-updater.sh
./firefox-updater.sh
The script downloads the latest tarball package of Firefox from the official
site and unpacks it under /opt along with creating a .desktop file in
/usr/share/applications.
It automatically detects if the user has sudo privileges and prompts for the
user or the root password accordingly during the installation.
This script can also be used to update Firefox when a
new version is available.
The script already links the firefox executable to /usr/bin/firefox-latest to make sure that it’s on the PATH. Execute the following command to also link it to /usr/bin/firefox:
sudo ln -s /opt/firefox/firefox /usr/bin/firefox
Enable showing user lists at login
Debian by default does not display the available usernames on graphical login screen but I like to show the user list so that usernames can easily be selected at login. To enable user lists at login for lightdm, my display manager of choice, paste the following content in /etc/lightdm/lightdm.conf.d/01_my.conf:
[Seat:*]
greeter-hide-users=false
Create users
To create new users, use the following Debian command:
adduser <username>
To change/update passwords of the created users:
passwd <username>
Desktop Environment specific customizations
I use XFCE as the desktop environment. So the customizations here are specific to XFCE only.
Panel customizations
By default XFCE comes with two panels, one at the top and one at the bottom of the screen. I move the bottom panel which is a launcher for applications to the left. Also in the top panel, I make the following changes:
- Add the following plugins:
- System Load Monitor
- PulseAudio Plugin
- Remove the following plugins
- Workspace Switcher
Update appearances
This section includes changing themes, updating fonts settings and general look and feel of the desktop.
- Change the theme: I use WhiteSur Gtk Theme theme for both the desktop and the windows. Also I move the window’s controls (minimize, maximize and close buttons) to the left to mimic the MacOS behaviour.
- Change the font settings: Fonts on Debian do not look the best out of the box. This is how my font settings looks like:
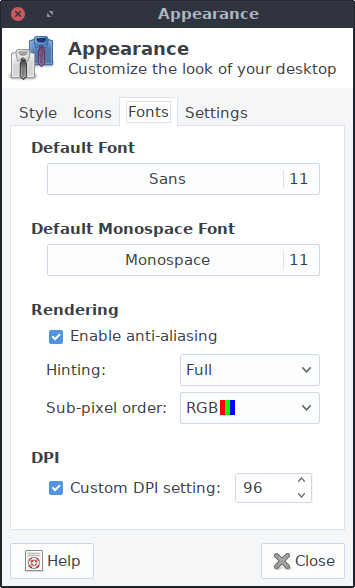
I usually play with the Hinting and Sub-pixel order settings till I get the best combination because these settings is dependent on the hardware and can vary from one hardware combination to another.
Conclusion
The steps are tested on a Debian 12 Bookworm installation. The choices made in this post are based on my personal requirements and preferences, it almost certainly will be different in your case. So the steps shared in this post should not be followed without understanding what they are meant for and if they are required for your case. For me, this post will definitely make it a lot easier when next time I install Debian on a new system.